
The design of pole barns is a very simple barn design. Rather than paying a contractor to do the work, building one yourself requires a little know-how, a little confidence, and just a few tools. These days it is pretty easy to find the answer to a question on-line, and with that in mind, here is a basic guide on building your own, inexpensive, pole barn.
Since you are building it yourself you can pretty much make it any size that you want based upon your needs. The first step is to find some flat ground where water does not accumulate. You will find it is far easier to build your pole barn in 8’ lengths, simply because the lumber you will buy comes in 8’ sections, like a 4’x8’ sheet of plywood. A 32’ barn for example is 4, 8’ sections and it is much easier to build it in dimensions that don’t require you to go to a lot of cutting.
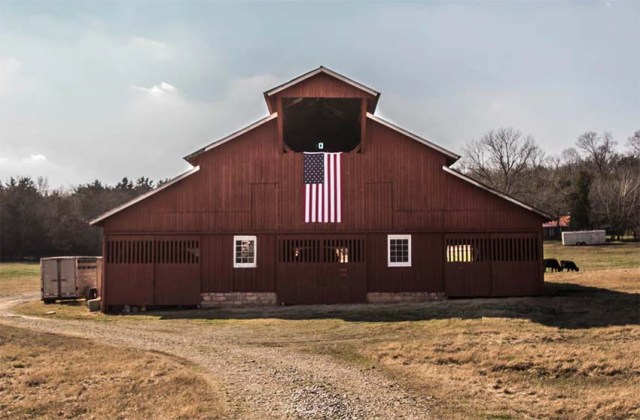
Obviously you can build your roof out of wood and shingles if you desire, but it is far easier to use corrugated sheet metal supported by trusses. Tin roofing comes in 4’ or yard long sheets and it is simple to cut them to any length. Where the sheets meet, you simply overlap them.
The most important thing when getting started is to make sure your pole barn is square. There are all kinds of ways to properly measure it out, but the easiest way is to use a transit to make sure that your corners are an exact 90 degrees. Once you have that done, dig your postholes using a posthole digger, or preferably a gas powered auger to save your back, and you are ready to get started.
The poles you use are up to you. Obviously you can buy poles at the lumber yard that are treated to last many, many years. Another option is tracking down old telephone poles which will undoubtedly be cheaper in price, but will require more work to cut them down to the desired length. You will probably want to use a hand saw when you cut them, as a chainsaw will get gummed up pretty quickly due to the oil and creosote used to treat the poles.
Once you’ve got your poles cut to the desired length, you will need to brace them in the holes. The best way to do this is to drive a stake in the ground roughly 6’ away from each pole and nail your brace to it. Using a level, stand each pole up and nail another brace to it, thus securing it in place. Stand one at the end of the wall and site down it making sure that you have a straight line on the outer edges. You can also use a transit for this task. Once you are certain you have the poles positioned correctly, pour some ready-mix concrete into each hole. Let it set for a couple of days and then will in the hole with dirt, tamping it down as you go.
The next thing you will do is nail your ‘stringers’ or the long boards, along the top edge of each pole to serve as the plate that will support the roof trusses. You will want to use 2”x6” for this and they come in 16’ lengths.
Trusses are the easy part as you can buy prebuilt trusses from most lumber yards. Since they will carry a lot of weight, this is generally much easy than making them yourself, plus you can be sure that they will all be the same size. An easy way to hang them is straight from the back of a pickup truck, assuming you have a friend to get on the other side of the truss and help you. A better way is to use a backhoe if you have access to one (or rent one) and nail a 2×4 along the stringer as a ‘stop’ mechanism. Then just use the backhoe to pick it up and anchor it in place. You will want a truss about every 4’.
The purlins are the boards that are nailed across the tops of the trusses lengthwise that the roofing will fasten to. 10’ long 2×4’s are best for this. You can run them every 2 feet and if you set them on the edge of the trusses you will have the greatest possible strength. The only issue there is, it gives you a smaller surface area when you nail the tin on. In other words, if you shoot a nail through the tin and miss the purlin, you will have a hole in the roof and a possible leak. To avoid this, simply lay the purlins flat and that way you double your surface area making it easier to hit it with a nail later on.
For your roof you will probably want to use galvanized roofing. It wont have nail holes in it, so you need to be careful about bending the tin etc. Using screw in roofing nails will help this a lot. They are more time consuming to apply but in the long run will give you a better looking roof than just using regular old nails.
Tin roofing will come in a long sheet that runs down from eave to ridge. You can overlap the pieces which will allow for some error and you don’t have to be as precise about cutting them that way. If you do need to cut it, just hide the cut edge under an overlap or ridge cap.
The bottom sheets will lay along the eaves, channels running up and down, sticking out a few inches past the eave line. The top sheets should overlap the upper end by about 6”. After this, the last thing to go up is the ridge cap. This should be galvanized and fastened down with the same screws. Just go right down the centerline with it and overlap where the ends of meeting sections of roof are, by about a foot to keep blowing wind out.
If you want to enclose your pole barn, you can, using taller poles from ground to roof peak midway to each end and then run a pair of poles between the middle and outer poles close to the ends. Run more stringers across the top and one at ground level. Evenly space 2” lumber (2×4’s are fine) around the walls, leaving space for a doorway. Once you have this done, you can fasten more of the metal roofing to it to create walls.
Obviously there are lot of ways you can customize your pole barn to fit your individual needs but this is pretty much it, you are done and have saved quite a bit of money by building it yourself!
